Google search

Custom Search

Monday, July 26, 2010

Get ready for the fantasy, Bumptop to give Google Chrome OS a 3D Desktop?

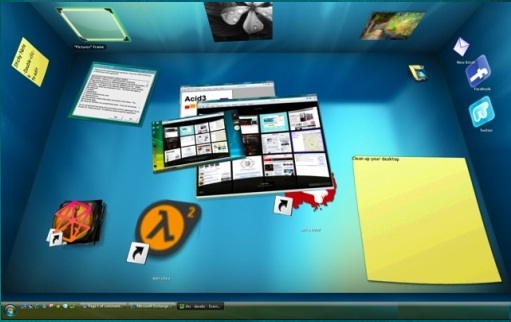
Bumptop is a software which allows Windows and Mac users to create realistic 3D environments on their desktops for handling files and folders. Desktop has not really changed much for most operation systems. Most of them still serve as a stationary jump off point for folders and files. BumpTop allowed users to use the 3D desktop in interesting ways.

Below is a snapshot of a typical desktop using BumpTop.

Visit the Bumptop website which is makes an interesting announcement.

Bumptop is not letting people download the software which converts the desktop into a 3d environment. Also it announces as it has been bought by Google it will not be supporting Mac and Windows any more. :-P

This pretty much points to Bumptop being used to give Chromium OS a killer desktop. Google probably might use this sort of software as a great interface for tablets which use Chrome OS. The first official release of the Chromium OS is supposed to be later in the year but there is not real clarity on it.

Bumptop had showed its awesome 3D desktop which could be used with a touch screen.


Thursday, July 22, 2010

Complete set of IP tools in one place

If you are a website admin you will be aware of many websites and services to carry out different ways to ping your website or even your computer or the IP provided to you by your ISP. Also there are many online tools which help you carry out a ‘whois‘ query on any URL.

IP Tools is a great website which has all things you require when it comes to looking up and playing around with IP addresses.


  • IPTools has a large suite of IP related tools. Some of the most obvious ones are it looks up your IP and displays it.
  • The other obvious tools included are looking up Ping, IP to Country, trace route and whois look-up.
  • There are other neat tools which allowed me to to email address and check if the domain offers free internet. Very useful if you see an email id with a interesting domain and want to check if the domain allows free email service.


Check if URL is safe to visit

If you are a net addict then you probably surf and look up hundreds of URLs over a week. Ofcourse many domains are visited regularly and hence you are quite sure about these links from a safety point of view. But it is always a good idea to see if the link you are visiting is safe or not.


  • URL Void actually looked up a URL you enter and checks if it is clean or infected using Web Of Trust (WOT), McAfee SiteAdvisor, Google Diagnostic and Norton SafeWeb to check it up.
  • URL Void also displays the websites IP Address, IP Country, IP Host and other detections of infections.
  • URL Void also shows us the latest infected websites and also a has sections where it shows the latest attacks caused with URL on its blog.

Personally I would have liked this service to had a add-on or extension instead of it being a place on the net where I had to enter the URL manually. I still like URL Void for its various network of services checking a web url. 

Do try out URL Void for a safe internet experience and do let me know if you are aware of better alternatives through your comments.


Wednesday, July 21, 2010

Monitor energy consumed for computers using Joulemeter

Joulemeter is a new application from Microsoft to monitor the consumption of power in computers. This application was released by Microsoft on 19 May 2010 and is currently in alpha-test state.


  • Joulemeter is designed to track the power and total energy consumption of running computers. This light-weight application will always reside in your memory, even if not started manually.
  • The statistics reports the power being consumed, average power, the total energy consumed and the total volume of CO2 released. The interface is so simple and neat. More developments can be expected in the stable version.
  • The statistics provides details about base power for running PC, power consumed for CPU, hard disk and monitor.
  • The uncalibrated model only gives the approximate statistics. For getting accurate measurements, calibration is necessary. But as far as I am concerned, the calibration always failed in all three attempts made. This may be due to some bug which is hoped to be fixed in the stable version.
The approximate statistics of power being consumed is calculated in watts (W) and the total energy consumed in calculated in kilowatt-hours (kWh). 1 kWh is commonly referred as 1 unit of energy. It is the same unit as read on the energy meters at home.

Joulemeter is handy and consumes very less memory. It gives the basic idea of power consumption in computers.


download link


Hide a file or folder in Linux?

Hiding a folder is a simple way of keeping prying eyes away from your private documents. From a human point of view it’s a good solution; what you can’t see, you don’t know you want. Encrypting a folder can have the opposite effect. The folder is visible and if access is attempted, the need to enter a password positively shouts the message that someone is trying to hide something. This probably explains why there are so many commercial utilities that claim they can securely hide folders.

Hiding a file is pretty simple in Linux ! Its just one step away 

Steps to hide a folder :

  1. Select the folder you wish to hide and rename it by either clicking F2 in keyboard or by a right click -> Rename..
    Screenshot Films File Browser 600x382 How to hide a file or folder in Linux?
  2. Add a ‘. ‘ (dot) in front of the name of the folder and press Enter
  3. Screenshot Films File Browser 1 600x382 How to hide a file or folder in Linux?Press F5 and now you cannot view that folder!

You are done !

Steps to view Hidden Folder :

The following step is used to Show/View the Hidden files.

  1. Just Open the desired directory and press Ctrl+H or Click View->Show Hidden files to view all the hidden files :)

    Screenshot Films File Browser 2 600x382 How to hide a file or folder in Linux?

  2. You can test to see if hidden files are being displayed by navigating to other folders
  3. You can Rename the folder anytime by removing ‘.’ from the folder name to revert it back to a normal one !

Now you know how to see all hidden folders on your computer in just a click away.The same Steps can be applied for files too !


Wednesday, July 7, 2010

Lock Document in Word 2010

Method 1. LOCK button

Before click the button, we should make sure the button apparent on the Word Quick Access Toolbar. Launch Word 2010, navigate to toolbar and from small drop down button, select More Commands. Just like the followed figure.

lock document in word 2010-1

Then you will get a Word Options dialog box. Go Choose commands from>All Commands, and you can see all cammands. Next, scroll down the list, find eht lock command and click on it. Select the buuton Add>>. Now you can see the lock button is on Quick Access toolbar pane. Just hit OK.


After these operations, the Lock button in the Quick Access toolbar.

lock document in word 2010-3

Click the button, and no one can write, edit, or modify. And click it again, the document is unlocked.

Method 2. Encrypt

Launch Word document which you want to protect with the password. Go menu>Prepare>Encrypt Document. Just like the figure below.

lock document in word 2010-4

Now a Encrypt Document box appearants. What we should do is just enter the password twice.

lock document in word 2010-5

lock document in word 2010-6

So far, you have lock your document with your own password. Another thing you should konw is that cancel the password is in the same procedure. The only difference is that you should make sure the password box is blank, and then save the file.

These two ways are all useful. Which one you will choose just depend on your conditions. Each one will be a nice helpful tool.

Two Magic Skills of Microsoft Word 2010

1. Remove background of Images

If we want to amend photographs which are inserted into the Word document, we usually have to launch Photoshop or Fireworks. Take removing background of images for example. In Word 2010, we can do it directly without any other soft wares. It is really good for simple backgrounds.

Launch Word 2010 and select the picture, then switch to "Format". In the drop-down boxes you should click on "Background Removal". The step is like the figure below.

some features of word 2010-1

The area with purple color as highlighted will be erased. And the one with the original color will stay. Drag the area and make sure it fit your demand. See the following figure.

some features of word 2010-2

Then look at the image, the background removed. It is so quick and easy for the image as the background is simple. Now we have a look at the final image followed.

some features of word 2010-3

2. Ligatures.

These are the original characters.

some features of word 2010-4

And these are characters after some steps.

some features of word2010-5

The concrete steps are not too complex, and you can master them easily. Right click on the word document and click on "Font", then switch to "Advanced" and select "Standard only" in the Ligature. After all these step, just click "OK", the final result will be like the figure above.

some features of word 2010-6

These two skills are just simple ones in Word 2010. We hope they can help you with some optimization.


Android Phones How to Back up SMS to Gmail

Overview: Android phones how to back up SMS to Gmail? With built-in Google Android Gmail contacts sync function, you are allowed to save your phone contacts in the address book for backup. However, large and growing capacity of increasing free Gmail email will also be a waste of space. It's better to back up Android SMS to Gmail left space. It will be easier to browse the Android SMS with the backup files on Gmail.

Are you still read your Android SMS messages online? The free SMS Backup app automatically back up your SMS messages to Gmail label. Here's the guide.

Step 1. Download SMS Backup on Your Android Phone

First we should go to "SMS Backup" page to download this application. And then install it on your Android phone by APK installer.

Android Phones How to Back up SMS to Gmail - SMS Backup

Step 2. Run SMS Backup

Open the WIFI function and run SMS Backup on your Android phone.

Step 3. Enter Your Gmail ID

Click the "Username" option, enter your Gmail mailbox ID user name and Password. check the "Auto Backup", wait for the connection network authentication account and password.

Step 4. Back up

Click the "Backup Now" button in upper right corner, you can do the backup operation and finish it.

10 Things to Do after Installing Ubuntu


 Ubuntu for Linux is a far more productive and effective and customizable operation system. It has been frequently asked by new Linux Ubuntu users what things to do soon after installing Ubuntu. So, i took this into consideration. Here's the answer for the 10 things to do after installing a new Ubuntu.You can read to know the 10 things to do after installing Ubuntu for Linux.

1. Install Simple Backup Suite for Ubuntu


This is the first thing to do after installing Ubuntu
to avoiding losing data in Linux. That is to install Simple Backup
Suite. It's a great desktop backup solution to avoid important data. You
can select which directories to back up, and then transfer the backups
to your external network storage.
    The command is: sudo apt-get install sbackup


2. Expand the Software Repository List


Load Synaptic, go to System -> Administration -> Synaptic
Package Manager. Click in the menu Settings -> Repositories. In
Ubuntu Software mark these repositories that will be accessed from the
Internet.
    On terminal type: sudo apt-get update, and then sudo apt-get upgrade

10 Things to Do after Installing Ubuntu

3. Install VLC Media Player in Ubuntu


If you prefer not to try to use different applications to play
different media formats. VLC media player plays almost all the media
types. It's a amazing application to play everything from an MP3 file to
a DVD video.
    The commond is: sudo aptitude install vlc and mplayer

4. Install Packing Software for Ubuntu


It's bad when you don't have Internet on your computer/notebook. What
to do if you have to pack or unpack something but the file format can't
be recognized by the system. To prevent from this situation, you can
install a bunch of packing software.
    On terminal type: sudo apt-get install unace rar unrar zip unzip p7zip-full p7zip-rar sharutils aish uudeview mpack lha arj cabextract file-roller

5. Get more Graphics with Compiz in Ubuntu


By default, Ubuntu only lets you choose from None, Normal or Extra
Compiz graphics configuration. Now you can install more advanced
graphics settings for compiz to make it more configurable.
    On terminal type: sudo apt-get install compizconfig-settings-manager gnome-art usplash startupmanager

6. Install Java for Ubuntu


Java is a very important program to install. Many programs like
Azureus need it to run.
    On terminal type: sudo apt-get install sun-java6-bin sun-java6-fonts sun-java6-jre sun-java6-plugin; sudo apt-get install equivs ttf-sazanami-gothic ttf-sazanami-mincho

7. Install More Fonts for Ubuntu


Actually, there are a bunch of fonts you can install on your system.
Please note that you don't need to install all of them.

On terminal type:
 sudo apt-get install ttf-larabie-straight ttf-larabie-deco mplayer-fonts


8. Install BitTorrent Client


Deluge: Written in python, great one: sudo apt-get install
deluge-torrent;
Azureus: Use Java to run, very complete but a bit heavy, type: sudo
apt-get install azureus


Things to Do after Installing Ubuntu
    On terminal type: sudo apt-get install azureus

9. Install Gparted - Make Disk Partition Easy


When you need to change your disk partition, you'd better install
Gparted to get ready, which is a great GUI software where you can easily
create, resize and format partitions on your hard disk.
    On terminal type: sudo apt-get install gparted

Things to Do after Installing Ubuntu

10. Get Rid of Unnecessary Stuff for Ubuntu


If you want to keep your Ubuntu clean, you need to uninstall some
software that comes with. Please check if to remove them or not.
    On terminal type: sudo apt-get remove "program name"


How to Make iTunes Work on Linux Ubuntu 10.4 using wine


Overview: It is widely known that iTunes is a useful and powerful software which is written for Mac and Windows only, and does not work for Linux. But is it a truth? If you read this article you will find that iTunes will run on Linux Ubuntu 10.4. I will teach you to How to make iTunes work on Linux Ubuntu 10.4. The software you will need in this article are iTunes and Wine. Some screen shots will be displayed to help you learn the tip.


How to Make iTunes Work on Linux Ubuntu 10.4

I will teach you to make iTunes work on Linux Ubuntu 10.4. No more words, let's start with the first step.

Step 1. Download Wine in Linux Ubuntu 10.4

How to Download iTunes in Linux Ubuntu-download wine

At first we will tell you some knowledge of Wine. Wine is a useful software which is written for Linux that allows it to run Windows software. You can successfully download Wine through the terminal:

sudo dpkg -i wine_0.9.45~winehq0~ubuntu~7.04-1_i386.deb

Step 2. Install Wine to the options

How to Download iTunes in Linux Ubuntu-wine options

Next to configure Wine to the options which comes up to the requirements. Type in the terminal "winecfg". Then choose the Windows XP option in the Allications tab. And then you need to select Autodetect in the Drivers tab. Once these have been done you can check the ALSA Driver and uncheck the OSS Driver in the Audio tab.

Step 3. Download iTunes

In this step you need to download the latest version of iTunes.

How to Download iTunes in Linux Ubuntu-itunes

Step 4. Go to the terminal once again

If you have download the latest version of iTunes you need to go to the terminal once again and then type:

wine iTunesSetup.exe

Step 5. Accept the license of the iTunes

Look at the welcome screen of the iTunes below.

How to Download iTunes in Linux Ubuntu-welcom screen

Now just accept the license for the latter steps.

How to Download iTunes in Linux Ubuntu-iTunes license

Step 6. Select the installer options


When the dialog window appears you just click on OK.

How to Download iTunes in Linux Ubuntu-itunes

Step 7. When it finish to download click on finish

How to Download iTunes in Linux Ubuntu-quicktime

Now the iTunes has been downloaded you just need to click on Finish.

How to Download iTunes in Linux Ubuntu-final

Step 8. Run the iTunes

Once you have download the iTunes successfully you will run it on your Linux Ubuntu 10.4.

wine ~/.wine/drive_c/Program\ Files/iTunes/iTunes.exe


How to Print Selected Areas of a Spreadsheet in Excel 2010

The Excel spreadsheet often has many cells, but sometimes you only need to print special areas of the spreadsheet. Here is the way to print out only specific areas of the document that you need.

Step 1. Highlight the area of the document in Excel 2010

You need to open the Spreadsheet you need and hold down the Ctrl key while highlighting the area of the document you want to print out.

How to Print Selected Areas of a Spreadsheet in Excel 2010-area

Step 2. Go to Set Print Area in Excel 2010

In this step you need to click on the Page Layout on the Ribbon, and then hit on the Print Area button, next to the Set Print Area.

How to Print Selected Areas of a Spreadsheet in Excel 2010-set  print area

Step 3. Page Setup in Excel 2010

The Page Setup window appears. Just select the Sheet tab. Now you need to type in the Columns and Rows that you want to repeat. And then click on Print Preview. Doing this and you can include any headers or labels associated with the data.

How to Print Selected Areas of a Spreadsheet in Excel 2010-page  setup

You will get a screen like this:

How to Print Selected Areas of a Spreadsheet in Excel 2010-preview

Step 4.  Select multiple areas of the spreadsheet

Sometimes you have to select multiple areas of the spreadsheet. Now that you have select one you just need to select another area and then click on Print Area and Add to Print Area.
 
How to Print Selected Areas of a Spreadsheet in Excel 2010-multiple areas
 

Step 5. Preview and set the printing options in Excel 2010

Once you click on Print Preview, Backstage View opens and you can make your own printing options from there.

How to Print Selected Areas of a Spreadsheet in Excel 2010-printing options

This is really a good method of saving ink and paper if you only need to print out specific areas of a spreadsheet in Excel 2010.