Google search

Custom Search

Saturday, September 25, 2010

How to make Counter Strike 1.6 Spray Logo

Counter-Strike Spray logo, spray decal or spray tag... its same name and simple to make them, first at all you must download some decal converter... we suggest to download HLTagConverter as most popular and easy program to use.

You can try for download "HLTagconverter" by using this links:


:: Download mirror (1) ::
:: Download mirror (2) ::

You can upload image as Counter Strike spray logo like this one


Step (1):
---------
When you are done with installing this program open HLTagConverter.exe, in the right menu u have one button with name "Open Image" click on it and open your own image.


(Image 01)

Step (2):
---------

For easiest way to show you, we choose desktop directory to open our default image... so open your image like this one bellow, you will have window with name "Open Tag Image" then select you image and click "Open" button.


(Image 02)

Step (3):
---------

In this step you will need to adjust image by clicking on "Adjust Image" button.


(Image 03)

Size of the image will be good to set up as default or click "Auto Size" button on the right menu, then you must click on the "Apply changes and convert to 256 colors" button like on the 03-1 image showed bellow.


(Image 03-1)

Step (4):
---------

You are almost done, next you have to do is clicking on the "Save Tag" button.


(Image 04)

and now you will have (3) options to convert the image in one of those file formats and save it... so you must click on the second option with name "Export to WAD File" after this click on the "OK" button to export the image in *.WAD file.


(Image 04-1)

Step (5):
---------

You will see window with name "Save As" save the image and name it "TempDecal.WAD" on your desktop for easy way to understand this tutorial, you can see on the 05 image bellow.


(Image 05)

So you are done with converting the image that you choose, now you will have to put your image in the game folder.

As usually copy the image and open the "cstrike" folder in your game folder... so paste the file here, maby you will have already file with that name, in that case you must click "ok" and replace the file.

Or you can follow this steps:

- Go to the Counter Strike 1.6 icon (The icon as you use it to open your game) select it and right click on it.

- Choose the last option "Properties" then click on the "Find Target" button.


(Image 06)

- Open the folder with name "cstrike" and paste there the file/image with name "tempdecal.wad"
Now open the game... make your own server with bots or join the internet server and taste you image... DO NOT CHOOSE THE SPRAY LOGOS in the options menu, just join the server and press "T" key to spray some logo.

If the file doesent work you try to put the file "TempDecal.wad" in this folder:

C:\Program Files\Steam\SteamApps\your-email\counter-strike\cstrike

So here is image that we have been created (Screenshot).


We hope that we help you how to make your own Counter-Strike spray logo... thank you.

Saturday, September 4, 2010

Disable User Account Control (UAC) the Easy Way on Win 7 or Vista

Note: Disabling UAC will lead to a less secure system, so be warned.
Disable UAC on Windows Vista
Open up Control Panel, and type in “UAC” into the search box. You’ll see a link for “Turn User Account Control (UAC) on or off”:

uac1.png

On the next screen you should uncheck the box for “Use User Account Control (UAC)”, and then click on the OK button.

uac2.png

You’ll need to reboot your computer before the changes take effect, but you should be all done with annoying prompts.
Disable UAC on Windows 7
Windows 7 makes it much easier to deal with UAC settings, and in fact you don’t have to completely disable UAC if you don’t want to. Just type UAC into the start menu or Control Panel search box.


You can simply drag the slider up or down, depending on how often you want to be alerted.


Windows 7 UAC Settings

If you drag it all the way down to the bottom, you’ll have disabled it entirely.


Disable Autoplay of Audio CDs and USB Drives

I find it very annoying when I go home from work and plug my laptop into my external hard drive… The autoplay window always pops up and asks me what I want to do with the files, which may be fine the first time, but definitely isn’t after a year of that.

To get to the configuration screen for this setting, go to Start Menu \ Run and type in:

gpedit.msc

You will see the Group Policy window. You should select Administrative Templates \ System in the tree view:

You will see an item in the right side pane called “Turn off Autoplay”

Double click the item, and set the radio button to Enabled, and change the “Turn off Autoplay on” to All Drives.

Now you should be safe from the autoplay monster.


download whole Photo album in facebook at once

NoteThis will work only in Firefox - so you need Firefox to be installed first.


Follow these Simple steps to download the photo Album

  1. Download the FacePAD Firefox extension directly from here. You may get a message block from Firefox - right click and allow that.


  1. Once you have installed - You will need to re-start Firefox to begin using the downloaded extension.
  2. You will now see FacePAD added to your list of addon extensions in Firefox.
  3. Head over to your friend's profile page and click on Photos. There you will find all the albums of your friends. Simply right click on the photo album and you will now get a new option "Download Album with FacePAD". Go ahead and download the album.
  4. You  will get an weird message to indicate that the album download has begun.
  5. You will now find all the photos of the FaceBook album neatly downloaded to your Hard Disk with almost no effort.


Creating IM Bot

This quick tutorial will show you how to develop your own functional IM bot that works with Google Talk, Yahoo! Messenger, Windows Live and all other popular instant messaging clients.

To get started, all you need to know are some very basic programming skills (any language would do) and web space to host your “bot”.

For this example, I have created a dummy bot called “insecure” that listens to your IM messages. To see this live, add insecure@bot.im to your GTalk buddy list and start chatting.


IM Bot

If you like to write a personal IM bot, just follow these simple steps:-

Step 1: Go to www.imified.com and register a new account with a bot.

Step 2: Now it’s time to create a bot which is actually a simple script that resides on your public web server.
It could be in PHP, Perl, Python or any other language.

Example Hello World bot:
The example below illustrates just how easy it is to create a bot.
This example is coded in PHP.

<?php

switch ($_REQUEST['step']) {
case 1:
echo "Hi, what's your name?";
break;
case 2:
echo "Hi " . $_REQUEST['value1'] . ", where do you live?";
break;
case 3:
echo "Well, welcome to this hello world bot, " . $_REQUEST['value1'] . "<br>from " . $_REQUEST['value2'] . ".<reset>";
break;
}

?>

Step 3: Once your script is ready, put it somewhere on your web server and copy the full URL to the clipboard.

Step 4: Now login to your imified account, paste the script URL

Screen Name: insecure@bot.im
Bot Script URL: http://www.insecure.in/imbot.php

Step 5: Add that im bot your friends list. That’s it.

This is a very basic bot but the possibilities are endless.

For instance, you could write a bot that will send an email to all your close friends via a simple IM message. Or you could write one that will does currency conversion.


Tuesday, August 31, 2010

monday test question bank for TEIT: MPPS

HEY FRIENDS DOWNLOAD THE QUESTION BANK FOR THE MONDAY TEST FROM THE LINK GIVEN BELOW
ALSO THE NOTES FOR SAME ARE AVAILABLE HERE


click here for notes


Monday, July 26, 2010

Get ready for the fantasy, Bumptop to give Google Chrome OS a 3D Desktop?

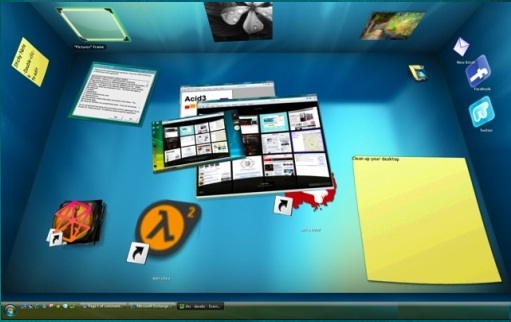
Bumptop is a software which allows Windows and Mac users to create realistic 3D environments on their desktops for handling files and folders. Desktop has not really changed much for most operation systems. Most of them still serve as a stationary jump off point for folders and files. BumpTop allowed users to use the 3D desktop in interesting ways.

Below is a snapshot of a typical desktop using BumpTop.

Visit the Bumptop website which is makes an interesting announcement.

Bumptop is not letting people download the software which converts the desktop into a 3d environment. Also it announces as it has been bought by Google it will not be supporting Mac and Windows any more. :-P

This pretty much points to Bumptop being used to give Chromium OS a killer desktop. Google probably might use this sort of software as a great interface for tablets which use Chrome OS. The first official release of the Chromium OS is supposed to be later in the year but there is not real clarity on it.

Bumptop had showed its awesome 3D desktop which could be used with a touch screen.


Thursday, July 22, 2010

Complete set of IP tools in one place

If you are a website admin you will be aware of many websites and services to carry out different ways to ping your website or even your computer or the IP provided to you by your ISP. Also there are many online tools which help you carry out a ‘whois‘ query on any URL.

IP Tools is a great website which has all things you require when it comes to looking up and playing around with IP addresses.


  • IPTools has a large suite of IP related tools. Some of the most obvious ones are it looks up your IP and displays it.
  • The other obvious tools included are looking up Ping, IP to Country, trace route and whois look-up.
  • There are other neat tools which allowed me to to email address and check if the domain offers free internet. Very useful if you see an email id with a interesting domain and want to check if the domain allows free email service.


Check if URL is safe to visit

If you are a net addict then you probably surf and look up hundreds of URLs over a week. Ofcourse many domains are visited regularly and hence you are quite sure about these links from a safety point of view. But it is always a good idea to see if the link you are visiting is safe or not.


  • URL Void actually looked up a URL you enter and checks if it is clean or infected using Web Of Trust (WOT), McAfee SiteAdvisor, Google Diagnostic and Norton SafeWeb to check it up.
  • URL Void also displays the websites IP Address, IP Country, IP Host and other detections of infections.
  • URL Void also shows us the latest infected websites and also a has sections where it shows the latest attacks caused with URL on its blog.

Personally I would have liked this service to had a add-on or extension instead of it being a place on the net where I had to enter the URL manually. I still like URL Void for its various network of services checking a web url. 

Do try out URL Void for a safe internet experience and do let me know if you are aware of better alternatives through your comments.


Wednesday, July 21, 2010

Monitor energy consumed for computers using Joulemeter

Joulemeter is a new application from Microsoft to monitor the consumption of power in computers. This application was released by Microsoft on 19 May 2010 and is currently in alpha-test state.


  • Joulemeter is designed to track the power and total energy consumption of running computers. This light-weight application will always reside in your memory, even if not started manually.
  • The statistics reports the power being consumed, average power, the total energy consumed and the total volume of CO2 released. The interface is so simple and neat. More developments can be expected in the stable version.
  • The statistics provides details about base power for running PC, power consumed for CPU, hard disk and monitor.
  • The uncalibrated model only gives the approximate statistics. For getting accurate measurements, calibration is necessary. But as far as I am concerned, the calibration always failed in all three attempts made. This may be due to some bug which is hoped to be fixed in the stable version.
The approximate statistics of power being consumed is calculated in watts (W) and the total energy consumed in calculated in kilowatt-hours (kWh). 1 kWh is commonly referred as 1 unit of energy. It is the same unit as read on the energy meters at home.

Joulemeter is handy and consumes very less memory. It gives the basic idea of power consumption in computers.


download link


Hide a file or folder in Linux?

Hiding a folder is a simple way of keeping prying eyes away from your private documents. From a human point of view it’s a good solution; what you can’t see, you don’t know you want. Encrypting a folder can have the opposite effect. The folder is visible and if access is attempted, the need to enter a password positively shouts the message that someone is trying to hide something. This probably explains why there are so many commercial utilities that claim they can securely hide folders.

Hiding a file is pretty simple in Linux ! Its just one step away 

Steps to hide a folder :

  1. Select the folder you wish to hide and rename it by either clicking F2 in keyboard or by a right click -> Rename..
    Screenshot Films File Browser 600x382 How to hide a file or folder in Linux?
  2. Add a ‘. ‘ (dot) in front of the name of the folder and press Enter
  3. Screenshot Films File Browser 1 600x382 How to hide a file or folder in Linux?Press F5 and now you cannot view that folder!

You are done !

Steps to view Hidden Folder :

The following step is used to Show/View the Hidden files.

  1. Just Open the desired directory and press Ctrl+H or Click View->Show Hidden files to view all the hidden files :)

    Screenshot Films File Browser 2 600x382 How to hide a file or folder in Linux?

  2. You can test to see if hidden files are being displayed by navigating to other folders
  3. You can Rename the folder anytime by removing ‘.’ from the folder name to revert it back to a normal one !

Now you know how to see all hidden folders on your computer in just a click away.The same Steps can be applied for files too !


Wednesday, July 7, 2010

Lock Document in Word 2010

Method 1. LOCK button

Before click the button, we should make sure the button apparent on the Word Quick Access Toolbar. Launch Word 2010, navigate to toolbar and from small drop down button, select More Commands. Just like the followed figure.

lock document in word 2010-1

Then you will get a Word Options dialog box. Go Choose commands from>All Commands, and you can see all cammands. Next, scroll down the list, find eht lock command and click on it. Select the buuton Add>>. Now you can see the lock button is on Quick Access toolbar pane. Just hit OK.


After these operations, the Lock button in the Quick Access toolbar.

lock document in word 2010-3

Click the button, and no one can write, edit, or modify. And click it again, the document is unlocked.

Method 2. Encrypt

Launch Word document which you want to protect with the password. Go menu>Prepare>Encrypt Document. Just like the figure below.

lock document in word 2010-4

Now a Encrypt Document box appearants. What we should do is just enter the password twice.

lock document in word 2010-5

lock document in word 2010-6

So far, you have lock your document with your own password. Another thing you should konw is that cancel the password is in the same procedure. The only difference is that you should make sure the password box is blank, and then save the file.

These two ways are all useful. Which one you will choose just depend on your conditions. Each one will be a nice helpful tool.

Two Magic Skills of Microsoft Word 2010

1. Remove background of Images

If we want to amend photographs which are inserted into the Word document, we usually have to launch Photoshop or Fireworks. Take removing background of images for example. In Word 2010, we can do it directly without any other soft wares. It is really good for simple backgrounds.

Launch Word 2010 and select the picture, then switch to "Format". In the drop-down boxes you should click on "Background Removal". The step is like the figure below.

some features of word 2010-1

The area with purple color as highlighted will be erased. And the one with the original color will stay. Drag the area and make sure it fit your demand. See the following figure.

some features of word 2010-2

Then look at the image, the background removed. It is so quick and easy for the image as the background is simple. Now we have a look at the final image followed.

some features of word 2010-3

2. Ligatures.

These are the original characters.

some features of word 2010-4

And these are characters after some steps.

some features of word2010-5

The concrete steps are not too complex, and you can master them easily. Right click on the word document and click on "Font", then switch to "Advanced" and select "Standard only" in the Ligature. After all these step, just click "OK", the final result will be like the figure above.

some features of word 2010-6

These two skills are just simple ones in Word 2010. We hope they can help you with some optimization.